 If you love to travel, I’d be willing to bet you also love to take photos and collect travel memorabilia, too. Is that you? But actually tackling the job of figuring out what to do with all these treasures once you get back home can make you feel like you need another vacation just to recover! This simple travel planner project will not only help you stay organized while you’re away, but you’ll also have an easy-to-put-together travel keepsake when you get back home. Sound like a plan? All you need is a few supplies, a travel destination, and these simple instructions.
Step 1: Collect your supplies. To create a travel planner you’ll need a few basic supplies.
- One 7″ x 9″ mini binder.
- Several sheets of 8-1/2” x 11” acid-free paper (one or two sheets for each day you’ll be away).
- Sheet protectors sized to fit your binder.
- Photo-safe adhesive.
- Fine point black marker.
- Travel-themed scrapbook embellishments such as patterned paper, rub-ons, stickers, chipboard letters, ribbon, and tags.
- Personal paper trimmer.
- Computer and word processing software.
- Camera.
Step 2: Plan your trip. As you set up your trip, record your travel details on this preformatted Word document, allocating one sheet per day. On the left side, type the day of the trip, the date, and your destination for that day. Under “Plans” list your itinerary, including flight information, hotel confirmation numbers, phone numbers, addresses, driving directions, sightseeing destinations, and shops or restaurants you plan to visit. Leave space below the “Our Memories” heading; you’ll use this as a journal while you’re traveling. (The right half of the page should be blank. This will be used for photos and / or additional journaling.)
When your plans are set, print your itinerary/memory pages on acid-free paper and use a paper trimmer to cut the sheets in half. (The “left” pages will have your daily itinerary and memories section, and the “right” pages will be blank.) Before printing, make sure your printer is set up to print in landscape orientation.
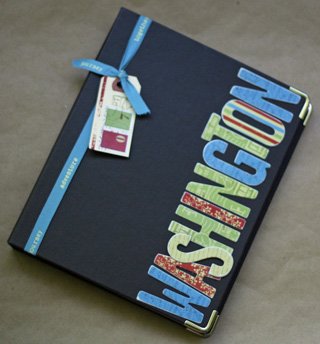
Step 3: Embellish your pages and binder. There are a number of ways to dress up your binder. Decorate the cover using chipboard letters and craft adhesive to spell out the name of your destination. Use strips of cardstock (approximately 3/8” wide) to embellish your pages (travel themed rub-ons or stickers can add a nice touch as well). Don’t over-decorate the individual pages—you’ll want to have plenty of room for photos and travel mementos.
Step 4: Set up your binder. Slide each itinerary and corresponding memory page into sheet protectors and insert them facing one another into your binder. Include extra blank pages and empty sheet protectors for days when you have a lot to record, and as a place to stash memorabilia you collect along the way. Add a map of your overall travel destination and / or specific locales. (You may need to do some cutting to fit these inside your sheet protectors.)
Step 5: Create and collect memories. Tuck your binder and a journaling pen into your carry-on and keep it with you during your outings—for referring to directions and other essential information, or storing brochures, postcards, business cards, menus, ticket stubs, coasters, and other interesting bits of paper you encounter along the way. Simply slide your treasures into the extra sheet protector designated for that day of the trip. Also, remember to take lots of photos each day you’re away!
Step 6: Record your reflections. Each day, chronicle your memories under the header called “Our Memories.” What did you do? What was most enjoyable? Did anything funny, extraordinary, or wonderful happen that you don’t want to forget? Capture these thoughts while they’re fresh in your mind and as an added way to focus on the fun you’re having on your trip.
Step 7: Turn your planner into a treasured keepsake. When you return home, turn your planner into a mini vacation scrapbook. Print out one 3” x 5” and one or two wallet-sized photos for each day of your trip. Attach these to the blank page for each day using photo-safe adhesive, and embellish your page with the memorabilia you collected on your trip. In no time at all, your handy travel planner will become a cherished lasting memento of your vacation – for years to come!

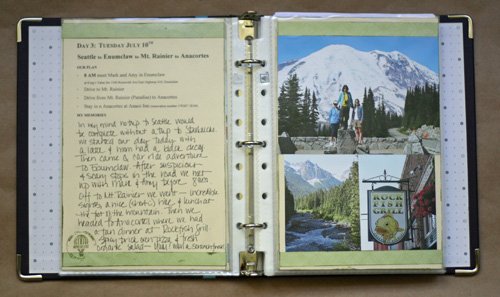
The finished project! The left page includes travel plans printed on the computer using the preformatted Word documents. Daily reflections were hand-written below. The right page includes photos. Each page includes simple embellishments—narrow like strips of paper and travel-themed rub-ons.
Bon voyage!

P.S. You’ll find that doing this little bit of preparation makes your trip and its chronicling so much easier, and really, so much fun! For a dose of this same kind of common-sense and easy-to-accomplish organizing know-how for any other paper clutter that ails you, you can sign up for Organize Your Paper Clutter. This class is now available as a self-paced online class which means you can start today and make progress on your time schedule! Sign up today — you’ll be so glad you did. 🙂

This is so cute, what a fun idea! I’ll be linking.
Oh VERY cool! Thanks for sharing!!!
Hi Aby, I will use this for future vacations. Thanks so much for this “How to”!
did you share this just for ME !!!!
Perfect timing Aby and I LOVE IT !!!
This is a great idea for our trip coming up just next week. I’m curious – do you also create a larger scrapbook later when you have more time? Or does this planner suffice as the entire photo memory keeper?
I love this idea. How do you use this same concept on a move? I’m a military wife, and we are in the middle of a move right now.
Thank you for sharing this idea, giving a tutorial, and even the template download. I always struggle with scrapbooking on the road, and this just makes it so SIMPLE and EASY! I will have to try this with my next trip, if not sooner with something else. This is a great way to stay organized and have a mini scrapbook after!
Wow! I missed the newsletter version because we were on a two week vacation with no wireless internet. 🙂 What a great way to plan & carry out fun times. I will definitely do this on our next trip. Thanks for sharing. I wish I could download your brain. The classes are a close second though.
Thanks for this! made one as a wedding gift to friends going on a 3 week honeymoon of europe! they loved it 🙂
Thank you for this helpful guide!
I’d like to add some advice if I could. If you are planning a trip make sure you use the travel meta-search site 1000travelsites.com to find the best prices on flights and hotels. They search pretty much every travel provider on the web in a matter of seconds. It’s the best site for finding the lowest price (and it’s free). I love it.
I wish I did this more often. I bought a guillotine paper trimmer specifically for travel planners and haven’t used it yet! 🙂